Using Builtin Editor
Builtin editor can be used to create maps, interfaces and menus. 3D and 2D components share the tooling, and they can be mixed and matched, meaning it is possible to build 3d world as background in menus, or using menus with in game play.
Editor Basics
Editor mode uses a free cursor control scheme. You can move around by “WASD” and look around by moving mouse cursor to edges of the screen. Please take note, editor windows have precedence over these controls, so if mouse is over a control, or if a text input is selected, these controls wont work.

The editor has 3 main windows. By default left of the screen is object properties, right is world properties and bottom is animation sequencer. As expected you can drag and drop and resize the windows. If no object is selected, only the world properties window is visible. Animation sequencer is visible only when creating an animation.
World Editor Details
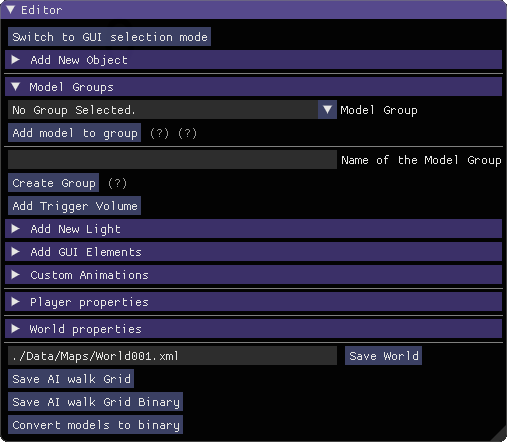
World editor loads up with almost all the features hidden by the titles. The fresh loaded window looks like this:
There are 2 main types of elements that can be used to build the world.
3D Objects
Lights
GUI elements
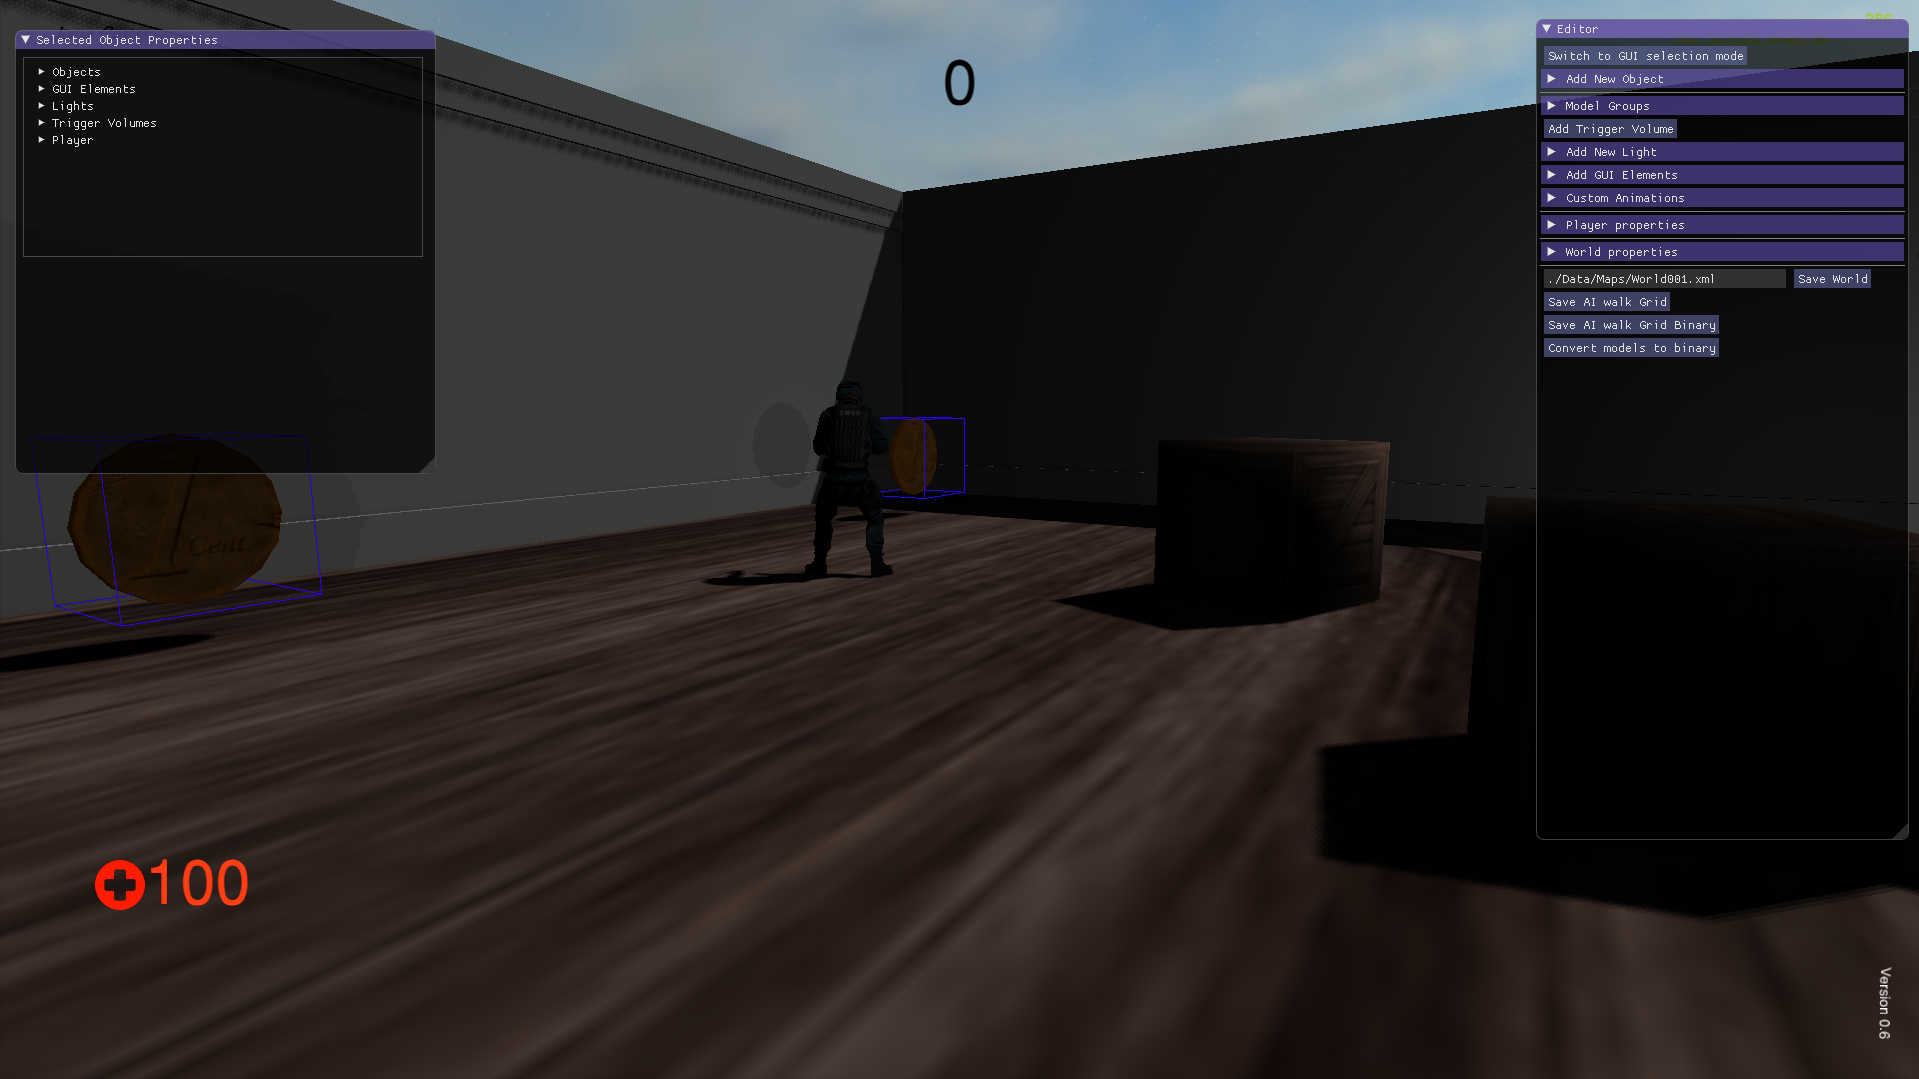
To make selection easier, click to select doesn’t work for both types at the same time. At launch you can select Objects. If you click “Switch to GUI selection mode”, you will be able to select GUI elements, but not Objects. The button will be replaced by “Switch to World selection mode”.
Adding 3D objects
There are 2 types of 3D object you can add to the world.
Models
Trigger volumes
It is also possible to create a ModelGroup.
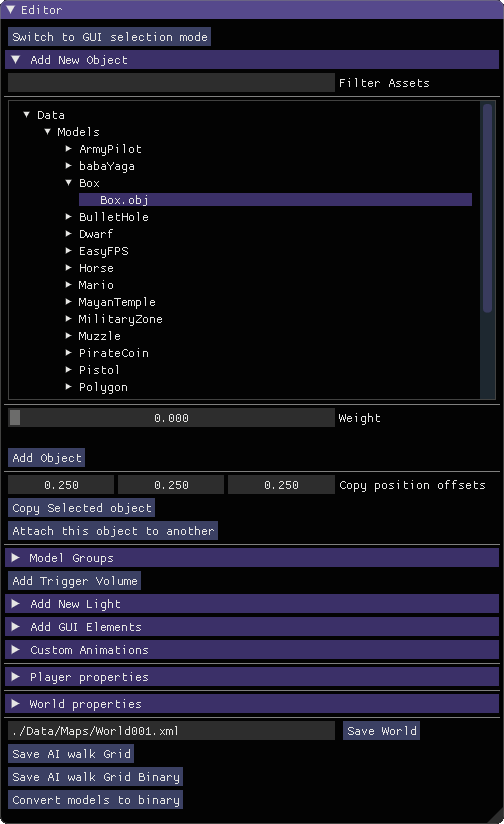
A directory tree of ./Data folder will be loaded, with directories that don’t contain model files filtered out. For filtering based on file name, the text box just above can be used. When mass is set to 0, the object will be marked “static” by physics system. This means the model will not be able to move, outside of the editor. It is the default setting, to be used for building the world. Any other value will mark the object as “dynamic”, meaning the objects movements will be governed by physics engine.
If an object is already selected, “Copy position offsets” settings and “Copy Selected Objects” button is shown. These are used to copy selected object, with given offsets. Offsets can be used to make copy automatically position so a grid or a wall can be easily created.
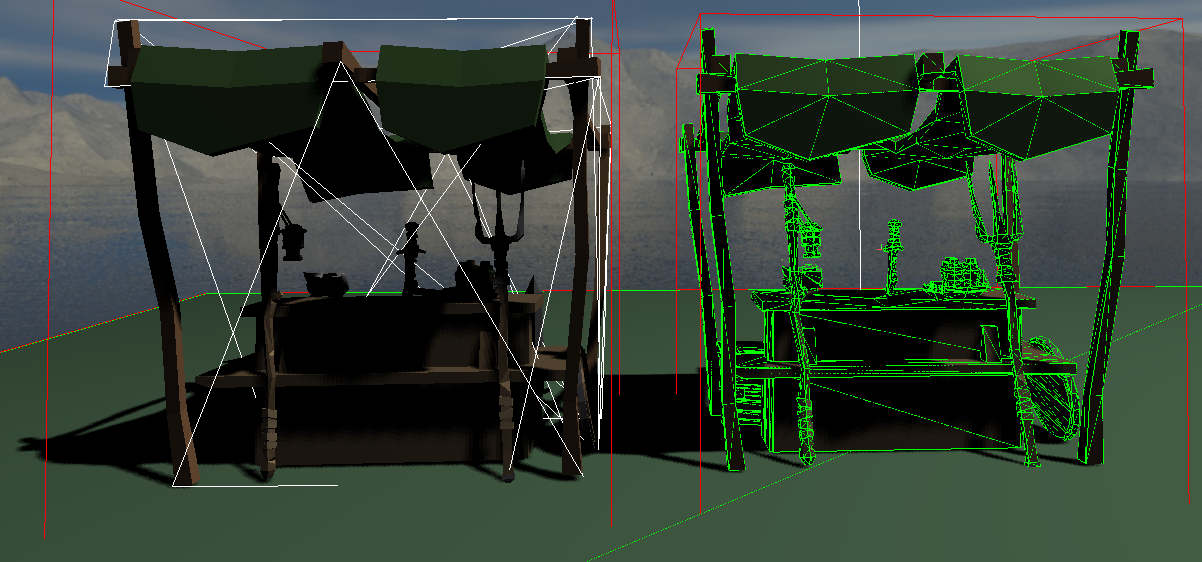
Dynamic object have Convex hulls (left), while static objects have full mesh as collision mesh (right).
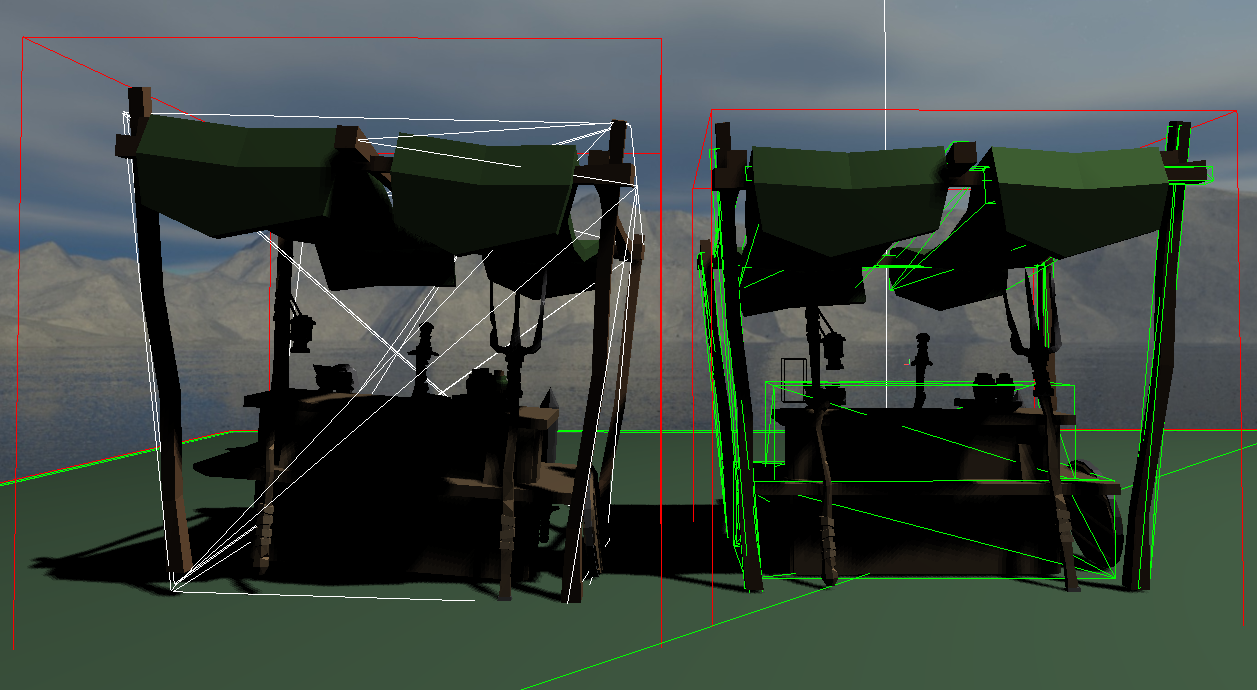
Static objects can use baked collision meshes(right)
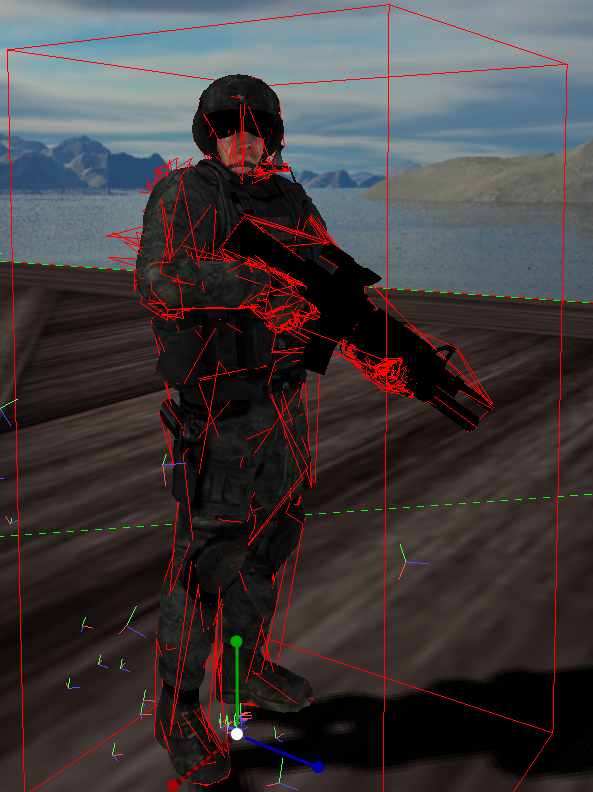
animated object has per bone convex hulls
Dynamic objects physical representations are simplified automatically. For inanimate models, the simplified representation will be a convex hull. This means the cavities, crannies etc. will not be calculated for them. For animated models, each vertex will be assigned the bone that has the most weight on it, and for each bone a convex hull will be created. It means separate members of the model will be calculates as such.
Static object have a full mesh representing physical object. It is possible to replace this with a simplified mesh. To do so, bake meshes with names prefixed with "UCX_". They will be used for physics.
Note
Models with animations, both from the asset itself and custom using the editor are considered “kinematic” It means the object is allowed to move, but the movement is not governed by physics engine. Those types of objects can’t be moved by physical interactions like pushing or pulling, but they can effect physical objects.
The mass of an object can be changed after it has been added to the world, both from the editor (the “Mass” field in the selected object’s properties) and at runtime through the API (setObjectMass / set_object_mass). Because the physical representation depends on the mass, the engine reloads the collision shape when the value crosses between 0 and a positive value:
Switching from 0 to a value greater than 0 turns a static object into a dynamic one: its full-mesh (or baked) collider is replaced with the simplified convex hull, and from then on its movement is governed by the physics engine.
Switching from a value greater than 0 back to 0 turns a dynamic object into a static one: it stops being driven by physics and gets the full triangle mesh (or baked
UCX_mesh) as its collider again.
The collision shape swap and re-registration with the physics world happen automatically; you no longer need to remove and re-add the object.
Note
Changing the mass has no effect on animated models. As described above they are “kinematic” and always use per-bone convex hulls regardless of mass, so there is no static/dynamic representation to switch between.
Add Trigger Volume button will create an empty cube. That cube can be used to trigger custom code paths. The details are at Trigger Object Settings.
Creating ModelGroups
A model group can hold unlimited number of models, or other model groups. It is used to make operations on multiple objects easier. First part of Model Groups section is used to put a model to a model group. Second part is used to create a new model group with given name.
Adding Lights

Limon Engine uses a custom forward renderer with full dynamic light calculation. Since these calculations are resource hungry, keeping the number of lights low is an important optimization. Limit for any given frame can be set using options. To make usage easier, only 1 directional light is allowed, and if it is set, that light is never disabled (assumed Moon/Sun). 1 directional + (limit - 1) point lights may be active at any given time. Engine itself decides which ones to activate and deactivate using player position, so adding any number of point lights is allowed.
Adding GUI Elements
GUI elements are rendered using layers. Each layer has a level, with default layer at level 0. Bigger levels are higher up, meaning when overlapped, the one with the higher level will be rendered.
You can add the following using the editor:
Layer
Text
Image
Button
Animation
GUI Layer
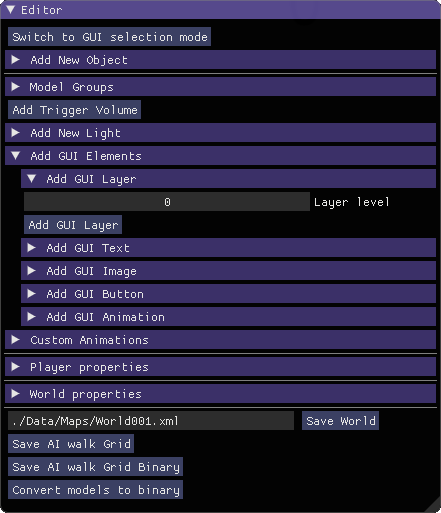
Add GUI layer menu allows you to add a new layer, with set level.
GUI Text
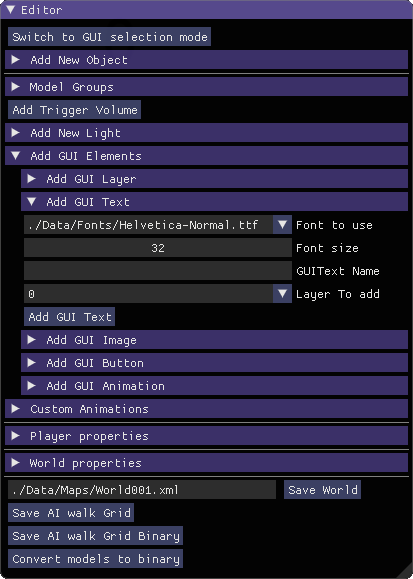
To add GUI text, you need to set the font, font size and name. The layer of the text can be selected from the drop down.
Note
Text scaling will be converted to font size on next load, to provide better quality
GUI Image
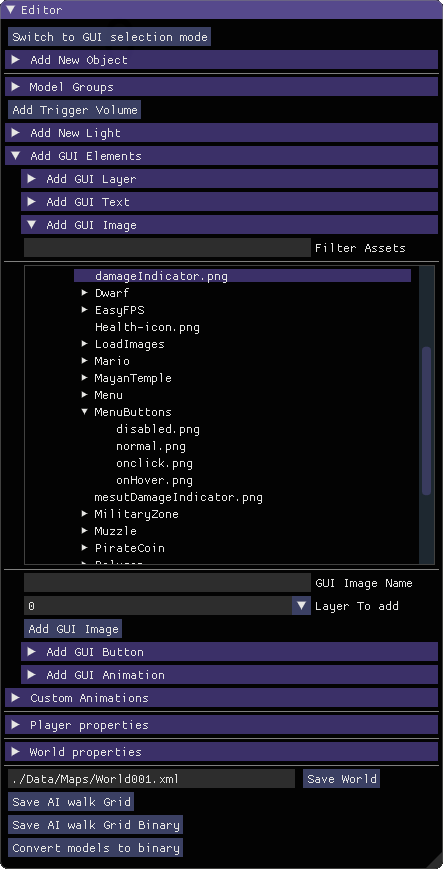
When adding Image as GUI element, a directory tree of ./Data will be shown, filtered based on supported image formats. To filter based on file names, the fiter text box on top of directory listing can be used. The layer of the image can be selected from the drop down.
GUI Button
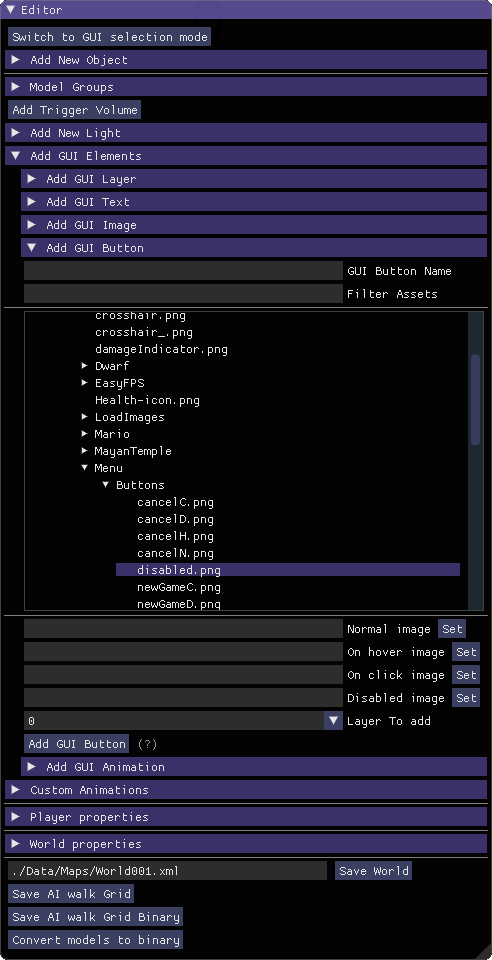
To add GUI Button, you need to set the name, and set normal image using directory tree. The rest of the fields are optional. For details please check GUI Button Settings. The layer of the button can be selected from the drop down.
GUI Animation

This Widget is not fully functional at 0.6 release. Please avoid until next release.
Player Properties
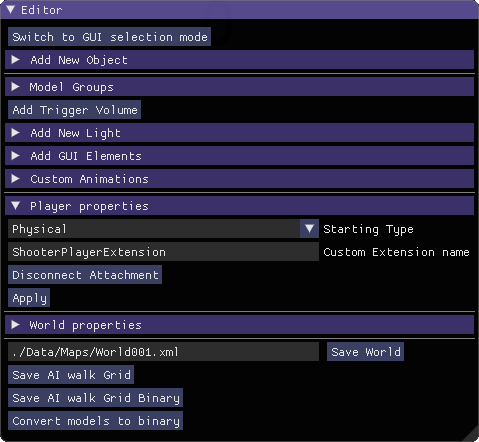
The Player properties section allows to set what is the launch time player mode. For game release, this should be either Menu, or Physical. Other types can be useful for development.
Physical: Normal Player for game play
Debug: The player that controls exactly like physical, but doesn’t interact with physics, so can fly and walkthrough objects. Also renders physics meshes, GUI borders and AI walk grid to allow debugging issues.
Editor: Builtin editor.
Menu: Menu interaction is allowed, movement and screen rotation disallowed. Mouse is set to free movement.
If a custom player extension is going to be used, it can be selected from the Extension Type drop-down. The drop-down is populated automatically from every registered player extension (the engine queries getExtensionNames()), so there is no need to type a name and risk a typo - only valid, loaded extensions are offered. Selecting an extension loads and enables it.
When an extension is selected, any configurable parameters it exposes are drawn directly beneath the drop-down, the same way Actor settings appear under a selected Actor. These parameters are edited here and saved with the map. An extension that exposes no parameters simply shows the drop-down with nothing below it. For how an extension declares these parameters, see How to Implement a Player Extension.
If player has a Model attached, there will be an “Disconnect Attachment” button.
Setting Up World Properties
The world properties is used to set map global properties.
OnLoad Actions

If map designer wants to launch some custom action at map load, this interface can be used to set as many as required. Details of them are at How to Implement an Action
Music
The level music is chosen here: pick a sound asset from the directory listing and press Change Music to set it as the map’s music, or Clear Music to remove it. The selected track is saved with the level and plays (looped) when the level loads.
The editor only authors which track is the level music. Runtime behaviour such as crossfading between tracks is done from scripts via set_music, and channel volumes (Master / Music / SFX / Speech) are global options rather than editor settings — see Audio Channels in the Python API reference. These are not adjustable in the editor because the editor runs with audio paused.
SkyBox
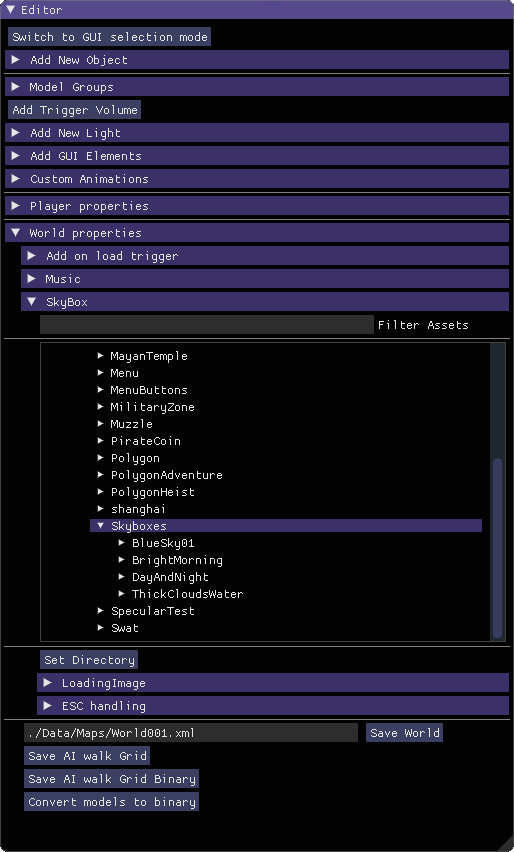
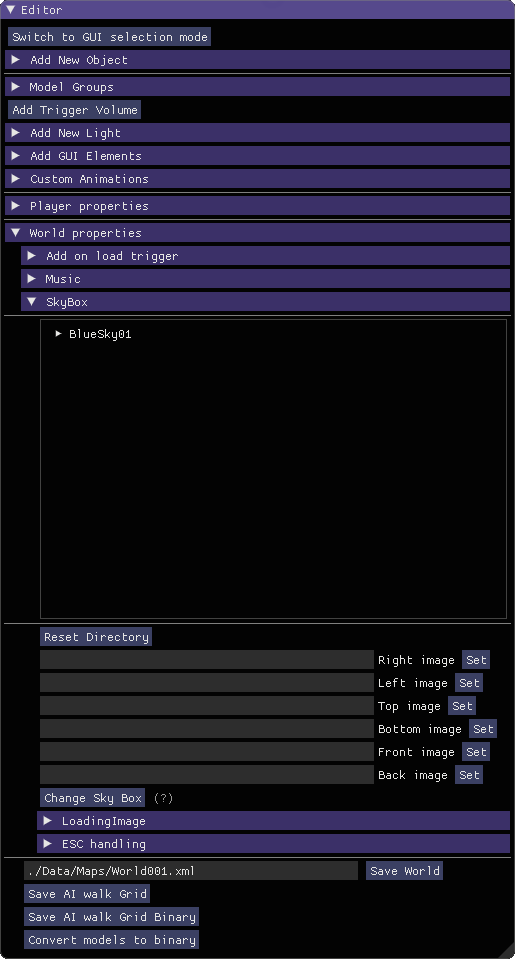
Setting skybox is two step process. First directory that contains the images is set, then 6 image that form up the skybox will be selected.
Loading Image
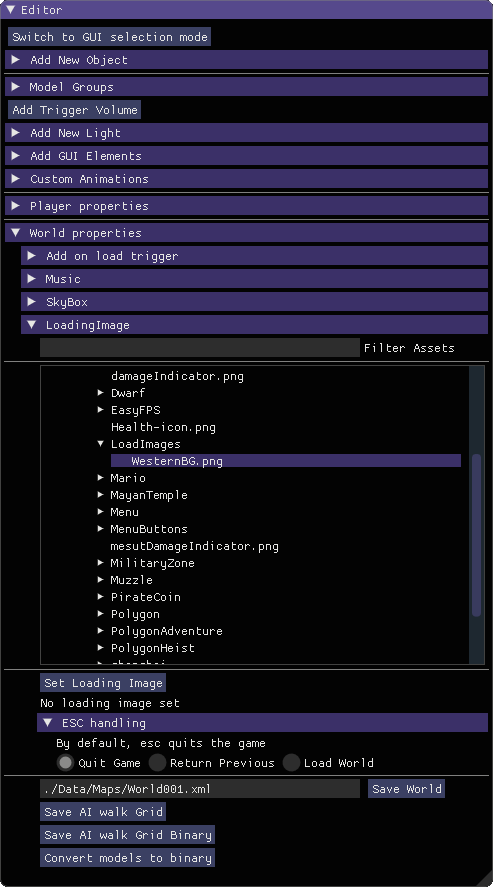
A loading image can be set using the loading image directory listing. If no image is set, an empty screen will be shown.
ESC Handling
This setting allows customising the behaviour of ESC key.
Quit Game: exits the game immediately without asking for a verification
Return Previous: Loaded maps list is kept within the engine. This option returns the world before current one. If this is the first world, or this world is loaded with force new directive, this option does nothing.
Load World: This option add a new text input to the editor. The map at the path entered will be loaded if not already, and the current map will switch to the entered one.
Other editor controls
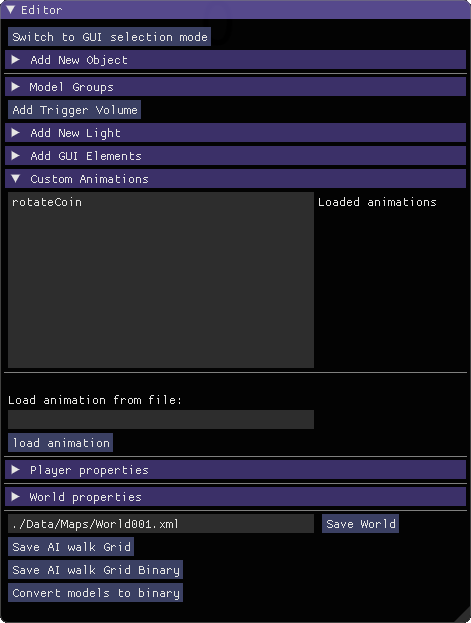
Loaded custom animations will be listed under custom animations for convenience. You can load other custom animation by entering the file path.
Saving the map
The map will be saved at the path when save world is clicked, overriding if it already exists.
Limon Auto generates a walking grid for path finding, used by AI Actors. Generating such data takes minutes on big maps, so saving it with map is a must for load speed of a map. There are 2 types of saving supported for this grid, binary and XML. XML should be avoided by game developers, it is only useful for engine developers. XML format can take up to 2GB of memory. Binary format is the go-to format.
Convert models to binary button scans all the models used in the map, and converts used assets to “*.limonmdel” files. This files use less ram, faster to load and not reversable, making them suitable for game releases. Map itself will be updated to use them if this button is pressed.
Warning
It is worth repeating. The save button overrides if there is a file with same name. Please pay attention.
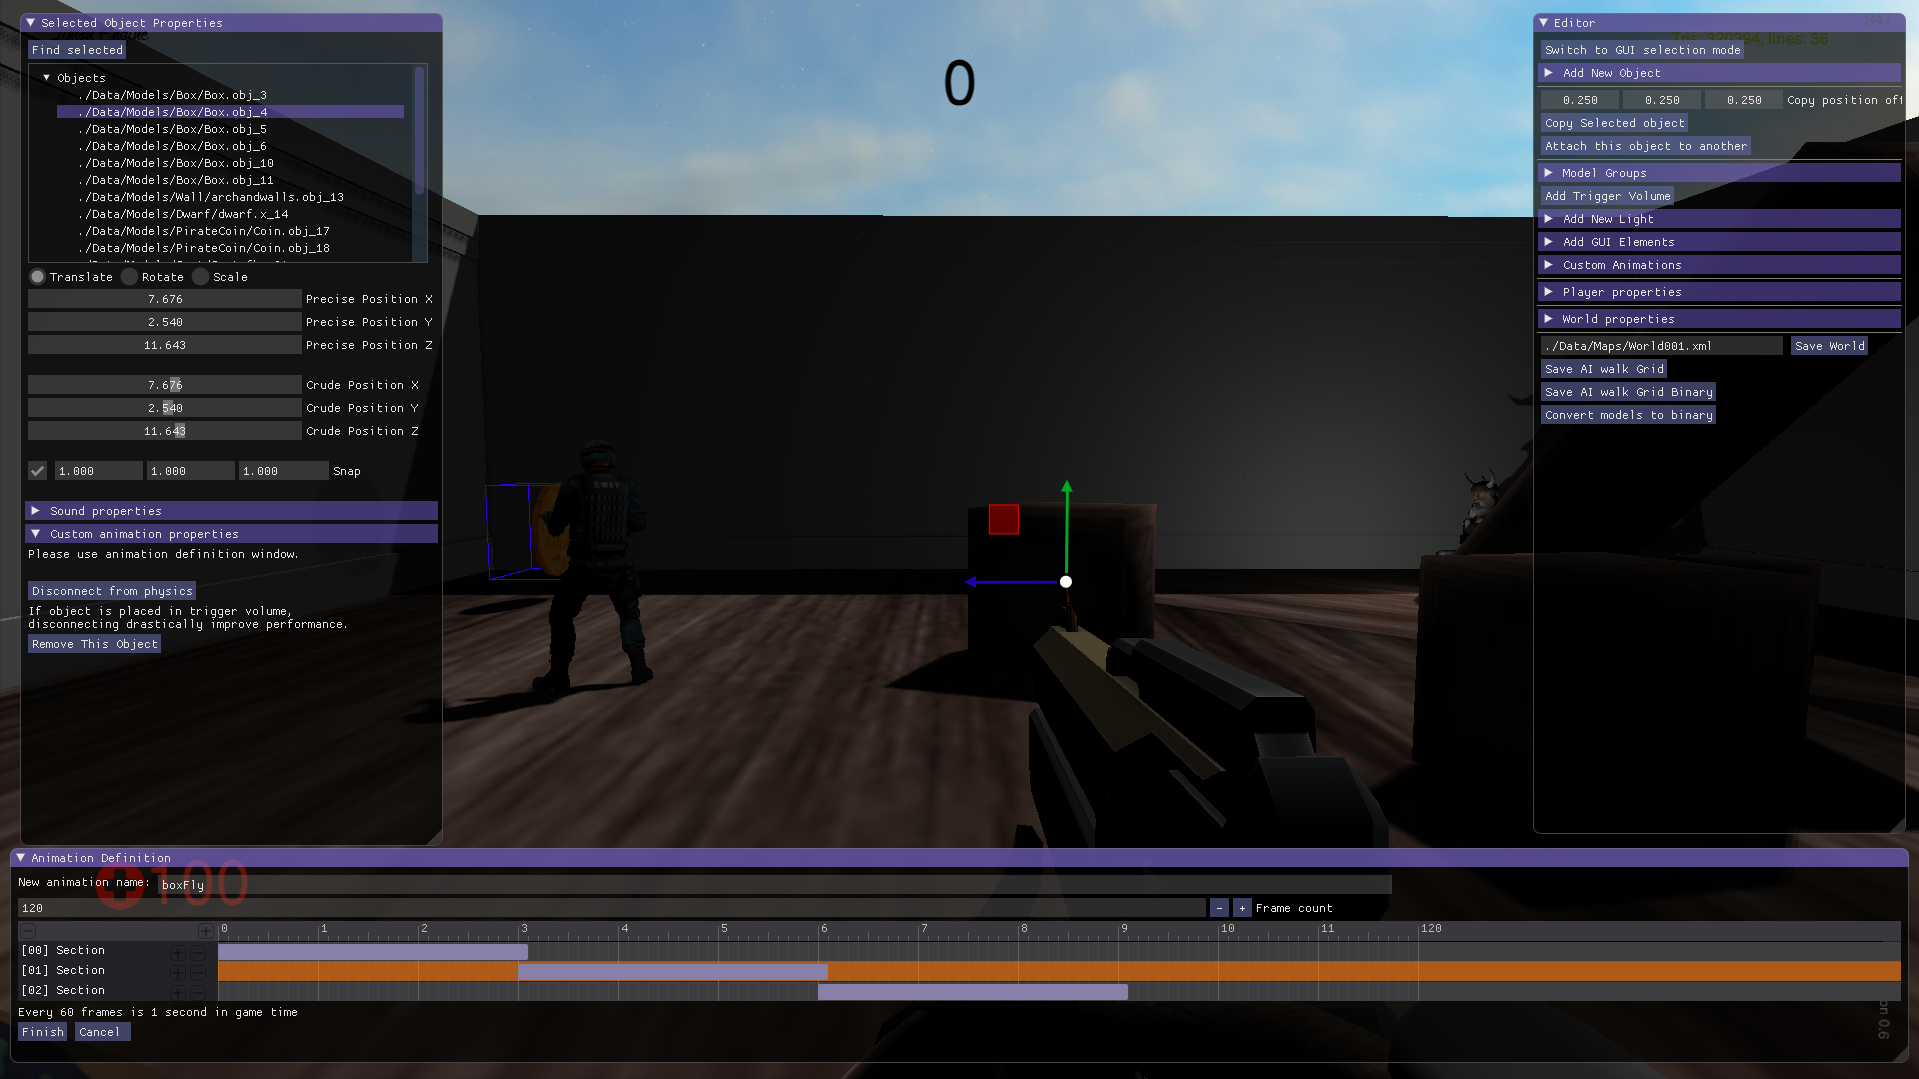
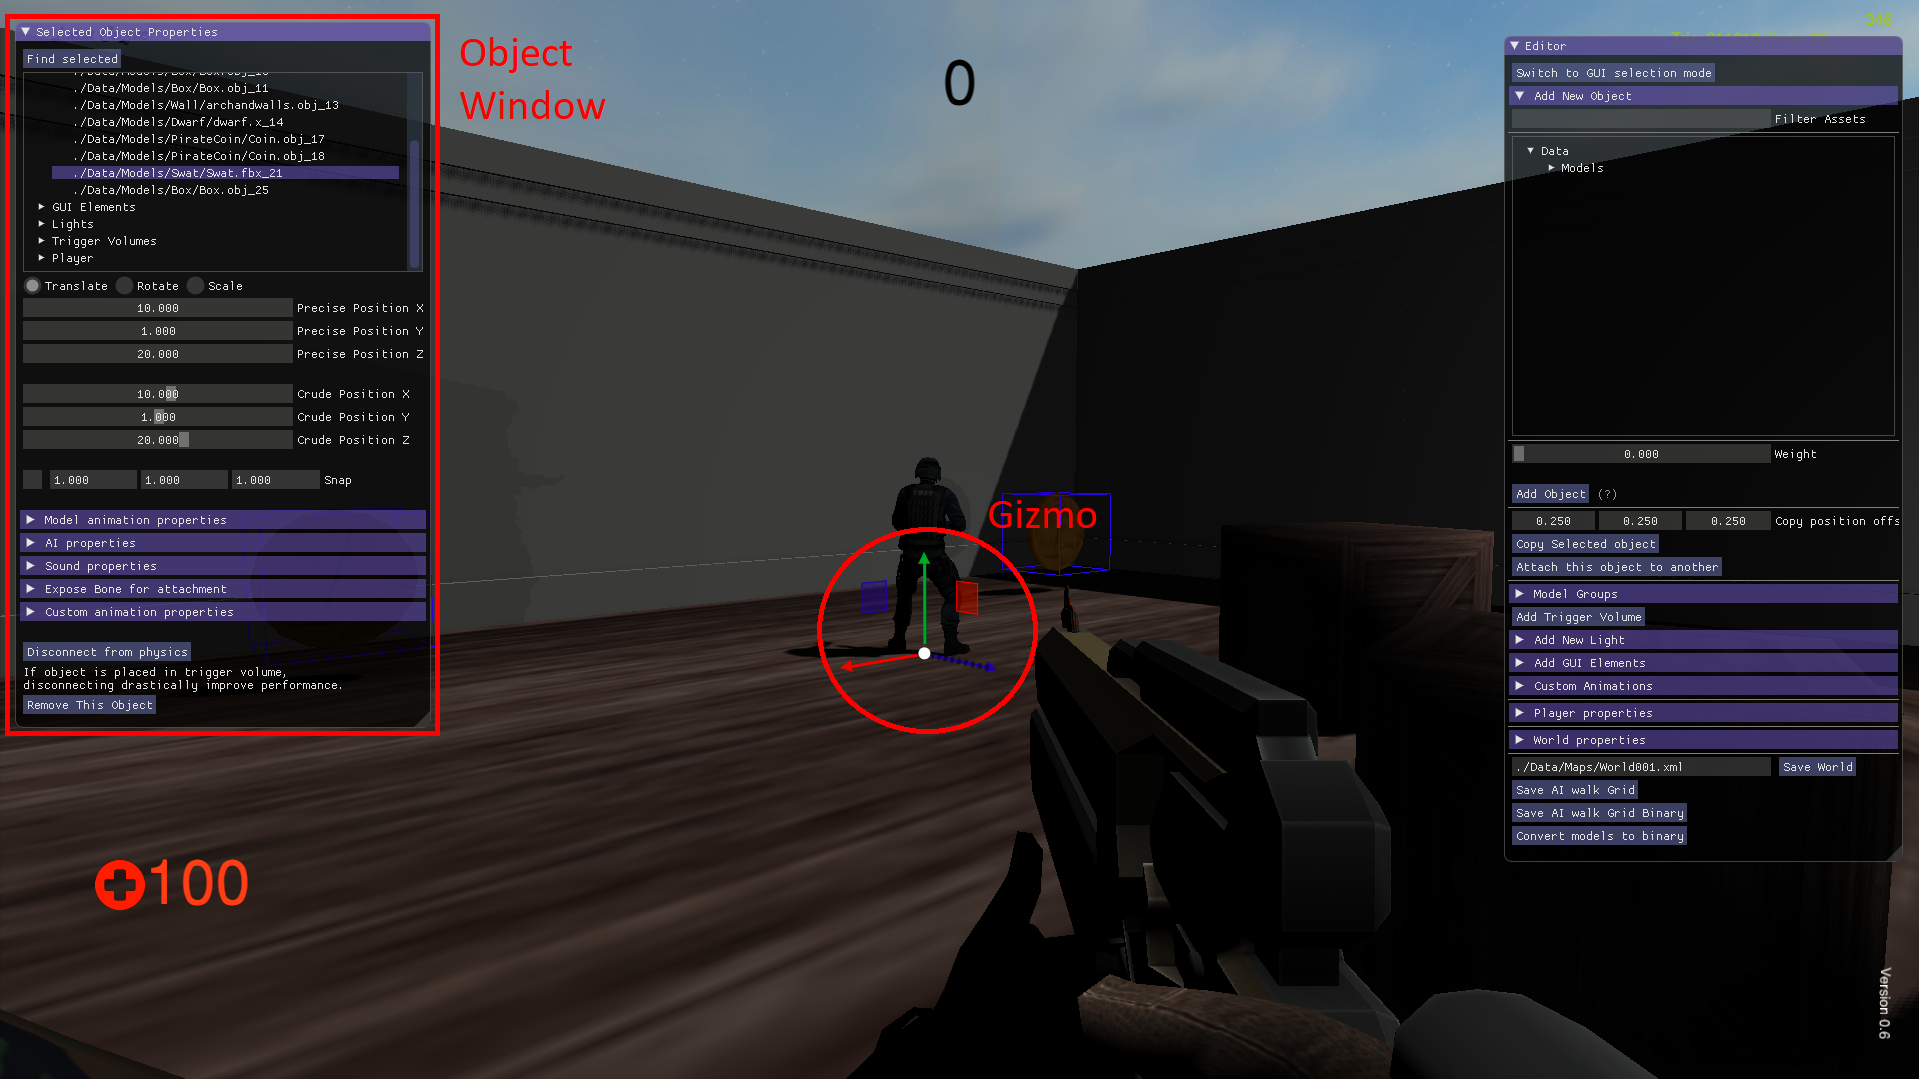
Object Editor Details
Object editor has two parts. One is the window that is on the left by default, and the other is the gizmos that appear at the position of the object. The window content changes based on the selected object. Each possible object type is documented separately below.
Object editor has tree view of the map, you can use it to change selected object, as well as clicking on them. All object have a remove button at the end of the window, which removes selected object completely.
Model Object Settings
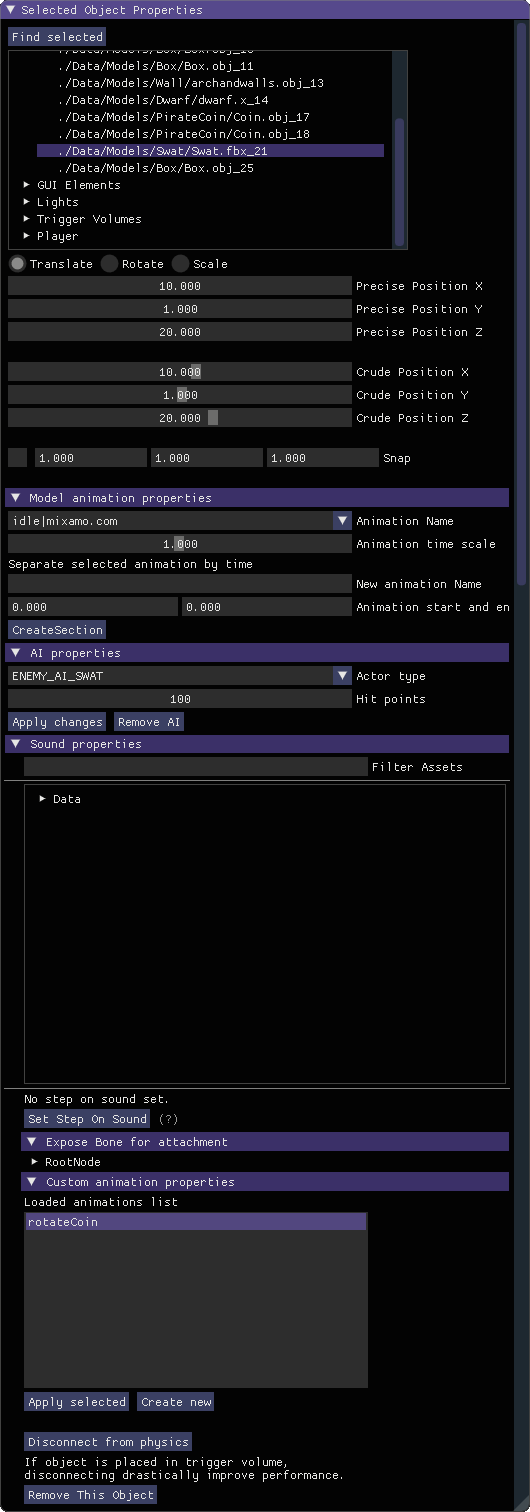
The model window with all options visible
There are 3 radio buttons under the selected object Drop-down. These are “Translate”, “Rotate”, “Scale”. Based on the selected mode, the 6 elements below change, but their usage is the same. First 3 are used for precise settings by dragging, or entering exact value by typing. To enter typing mode, you should double click the item. The second 3 items are for setting the values with bigger differences.
Just under these settings, there is snap settings. It is used by gizmo. For details check Gizmo Usage.
On Top (shortcut: T)
The On Top checkbox, just below the snap settings, automatically places the object flush on the surface immediately beneath it. When checked, every time you move the object it drops down to rest on whatever is below it, so you can drag it horizontally across uneven terrain and it will follow the ground height continuously. The search range is limited: surfaces more than approximately 10 world units below the object will not be found.
If the loaded model contains animations within, these animations are listed under the “Model animation properties”, and the speed of this animation can be set using “Animation time scale”. If a new animation as part of old one is needed, “Seperate selected animation by time” part can be used. It takes 2 floats as input, and a name. After Create section button is clicked, the animation will be listed just as others.
Limon also supports loading animations from another file, specifically to support Mixamo.com animations. When a model is loaded, Limon checks if there is a “Mixamo” directory at the same path, and if it exists, try to loads the files in that directory as animations for model.
AI properties section has a list of available Actors. Game developers can write custom actors using API provided. Please check How to Implement an AI Actor for details. If selected actor has settings exposed, they will be listed under actor type drop-down.
Note
If model has no animation, it can’t be assigned an AI. Both Animation properties and AI properties will be hidden in that case.
Under AI settings, there is “Step on Sound” setting. This is used as step sound when “Physical player” move on top of the model.
After That there is “Custom animation properties”. This section lists currently available animations, you can apply any of the custom animations to any number of models. If you want to create a new custom animation, you can do so by using “Create new” button. This button will open animation sequencer.
Disconnect from physics button removes the collision mesh from map so the object won’t be interacting with physics engine. This can be useful for small probes that should be ignored.
Flip Model
Models can be flipped on the X, Y, or Z axis - any combination of axes is supported. The flip setting is a property of the model object and is editable in the object editor.
When a flip is applied, the engine generates a flipped mesh asset in the background using the same shader and material path as the original. There is no per-instance runtime cost - the flipped mesh participates in instanced rendering identically to the original mesh.
Trigger Object Settings
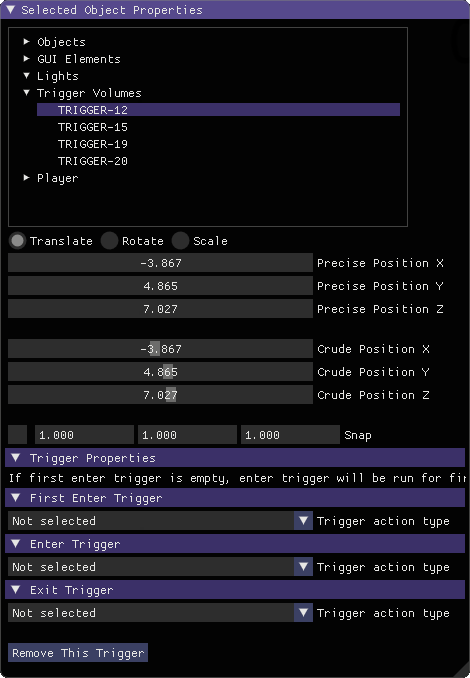
The trigger object has same interfaces with model for transformation settings. The difference is at “Trigger Properties” section.
This section has 3 Trigger settings.
First Enter Trigger.
Enter Trigger.
Exit Trigger.
The details of Triggers settings are not predefined, triggers can define their own settings. For details on implementing triggers, see How to Implement an Action. Any or all of the triggers can be left unset.
The logic of triggers is as follows:
If player is not detected, and wasn’t detected last frame, do nothing.
If player is not detected, and was detected last frame, and Exit Trigger is set, run it.
If player is detected, and was detected last frame, do nothing.
If player is detected, and wasn’t detected last frame:
If player was not detected ever before, and First Enter Trigger is set, run it.
If player was not detected ever before, but First Enter Trigger is not set, and Enter Trigger is set, run Enter Trigger.
If player was detected before, if Enter Trigger is set, run Enter Trigger.
GUI Text Settings
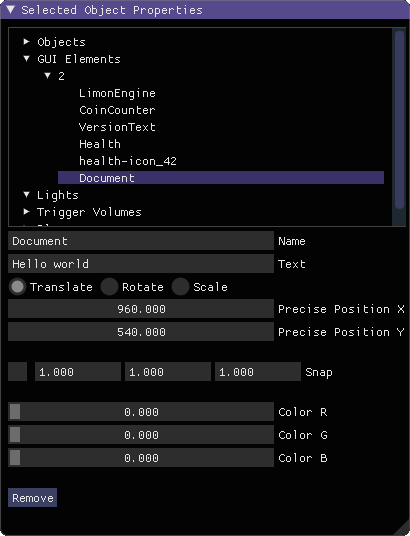
GUI Text has custom name that can be updated using the name field. This field doesn’t allow spaces of any kind.
The text to render is set using Text field.
Position X and Position Y is used for transformation of the text, and Color R G B are the text color.
GUI Image Settings
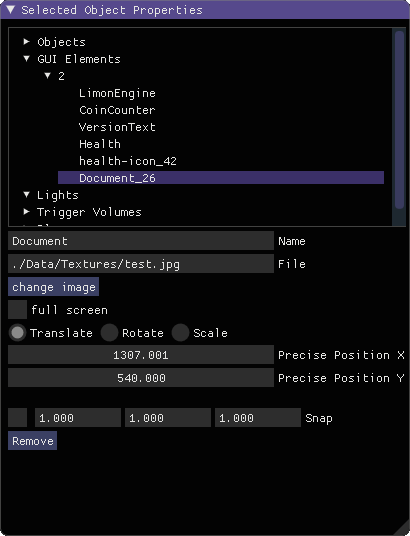
GUI Image has custom name that can be updated using the name field. This field doesn’t allow spaces of any kind.
The File is the path to image file. Changes on this field is only applied when change image button is clicked.
Full screen click box scales the image to fill the screen, and disables scale and position settings.
Position and Scale are used to set the Transform of the image.
GUI Button Settings

GUI Button has custom name that can be updated using the name field. This field doesn’t allow spaces of any kind.
There are 4 file settings. Only the Normal file is required, the rest are optional.
The Button can be interactive, depending on the player state. If player is set interactive, the following logic is used:
If The button doesn’t have an trigger, and have a disabled image set, the disabled image will be shown.
If on click image is set, and mouse is down over the button, on click image is shown. Also Trigger will be run. For details, please check How to Implement an Action.
If on hover image is set, and mouse cursor is over the button, that image will be shown.
If all else were wrong, the normal image will be shown.
Position and Scale are used to set the Transform of the button.
Trigger section allows to set the trigger to run when clicked.
Just under these settings, there is snap settings. It is used by gizmo. For details check Gizmo Usage.
Gizmo Usage
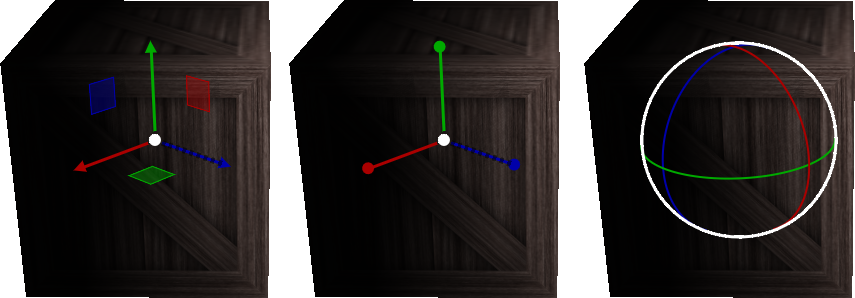
Gizmo types: Translate, Scale, Rotate
The gizmo is the tool interface that appears at the position of the object that is selected. It has 3 modes, translate(move), scale and rotate. These modes are set using the object editor window, and not all of them are available for all object types. They are directly attached to the editor information, so change in one will update the other.
All three modes use same logic. Dragging an axis applies the transform on that axis. Meaning while in translate mode, clicking on vertical line and dragging will move model vertically. Dragging by the center moves freely, without axis locking. Translate mode also has boxes that can be used to move on a plane, instead of a line.
Some objects have an snap setting. This setting is used by the gizmo, to determine step size of the update. Snap of 0.25 in scale mode means dragging the gizmo will scale the object as 1, 1.25, 1.5, 1.75 etc. Same applies for translate and rotate too.
Material System
Materials define the visual appearance of meshes - colour, specularity, and up to five texture slots. Every material in the world is tracked in a flat registry regardless of where it came from.
Where Materials Come From
When a model is added to the world, its embedded materials are loaded and registered automatically. If two models share the same source material, it is loaded once and shared - deduplication is automatic. Custom materials you modify in the editor are saved in the world file, but the asset manager treats them identically to model-sourced materials. The origin of a material has no effect on how it is managed at runtime.
For details on loading, lifetime, and cross-world sharing see Asset Management.
Material Registry
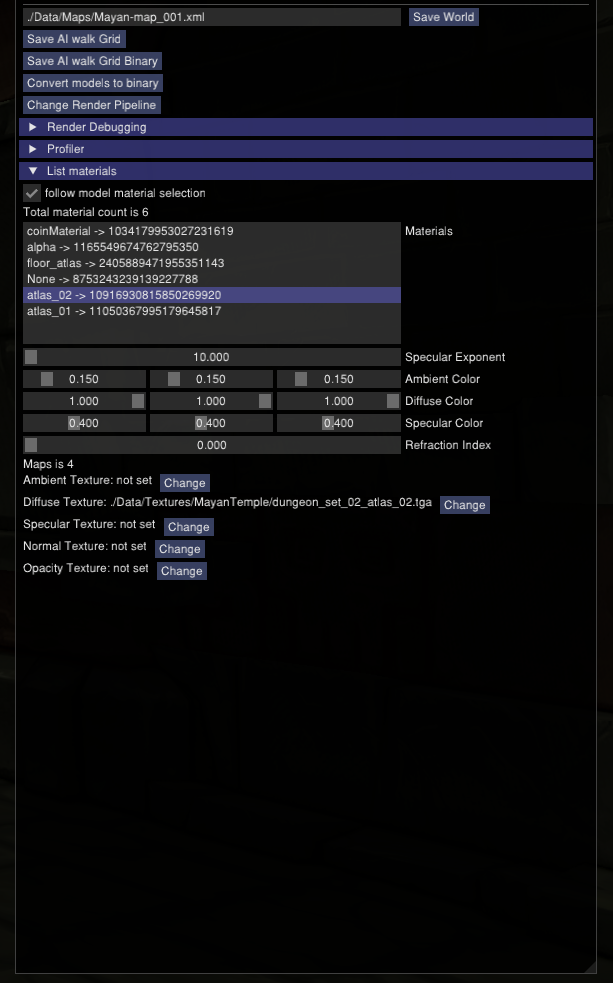
The material registry panel showing all materials in the current world.
The world editor maintains a list of every material currently in use. Selecting a material from the registry and editing it is a global edit - the change propagates immediately to every mesh using that material.
Editing a Material on a Specific Model
When a model is selected in the object editor, its materials are listed. Each material offers two options:

Per-mesh material editing with preview.
Edit globally - edits the shared material. All meshes using it are affected immediately.
Edit per-model - creates a permanent copy assigned only to this mesh. The original is unchanged. The new copy appears in the registry and can be shared or edited like any other material.
Material Properties
Property |
Type |
|---|---|
Diffuse colour |
RGB |
Ambient colour |
RGB |
Specular exponent |
Float |
Diffuse texture |
Texture slot |
Ambient texture |
Texture slot |
Specular texture |
Texture slot |
Normal texture |
Texture slot |
Opacity texture |
Texture slot |
Animation Sequencer Details

Limon Engine can be used to animate objects or GUI elements using all three transformations. You can select the object you want to animate, and use the custom animation section. If you choose to create a new custom animation, the animation sequencer will be shown.
The sequencer starts with animation name. You can’t save/finish an animation without a name. If animated object is a GUI element, translate z component will be used by alpha channel, enabling animating alpha changes.
Warning
If an animation with the same name exists, the old one will be overriden.
Warning
Animations for GUI elements and 3D objects can be used interchangeably, but the results might not be as predicted.
Second line is how many frames long the animation will be. After that the main sequencer part comes. The “-” symbol is used to hide/show the sequences. “+” sign is used to add a section to the end of the animation. Each section has “+” and “-” symbols next to them. “-” removes the section, and “+” add a section just after the selected one, with the same length.
Note
Animations are considered 60 frames per second.
How to create animations
When sequencer is shown, it will have 1 section. You can imagine the sections, as “What is the final transform, after given time”. You can move the object around, scale, rotate as you wish, to set the transform. THe length of the section is time. If you want the animation to have multiple sections, you can press the either “+” button to add another section. When you hit finish, the animation will be saved and applied.
Note
The custom animation is assumed to be built for the selected object, and to run in a loop, starting with map load. If this is wrong, you can remove the animation from the object.